> For the complete documentation index, see [llms.txt](https://docs.wisej.com/hybrid/llms.txt). Markdown versions of documentation pages are available by appending `.md` to page URLs; this page is available as [Markdown](https://docs.wisej.com/hybrid/storage/store-data-locally-with-sqlite.md).
# Store Data locally with SQLite
{% hint style="info" %}
This guide applies to [Wisej.NET Hybrid **Local** applications](/hybrid/development/local-application.md). To use a local database from a Wisej.NET Hybrid **Remote** application you will need to create a [bridge](/hybrid/advanced/custom-handler.md).
{% endhint %}
### Example Project
{% embed url="" %}
### Install the SQLite NuGet package
Use the NuGet package manager to search for the **sqlite-net-pcl** package and add the latest version to your .NET MAUI app project.
There are a number of NuGet packages with similar names. The correct package has these attributes:
* **ID:** sqlite-net-pcl
* **Authors:** SQLite-net
* **Owners:** praeclarum
* **NuGet link:** [sqlite-net-pcl](https://www.nuget.org/packages/sqlite-net-pcl/)
Despite the package name, use the **sqlite-net-pcl** NuGet package in .NET MAUI projects.
Important
SQLite.NET is a third-party library that's supported from the [praeclarum/sqlite-net repo](https://github.com/praeclarum/sqlite-net).
#### Install SQLitePCLRaw\.bundle\_green
In addition to **sqlite-net-pcl**, you *temporarily* need to install the underlying dependency that exposes SQLite on each platform:
* **ID:** SQLitePCLRaw\.bundle\_green
* **Version:** >= 2.1.0
* **Authors:** Eric Sink
* **Owners:** Eric Sink
* **NuGet link:** [SQLitePCLRaw.bundle\_green](https://www.nuget.org/packages/SQLitePCLRaw.bundle_green/)
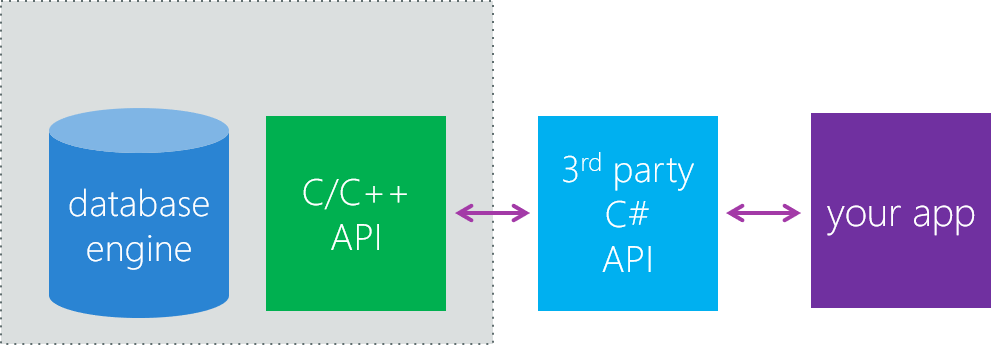
### What is SQLite?
SQLite is a lightweight cross-platform local database that's become an industry standard for mobile applications. SQLite doesn't require a server. The database is stored in a single disk file on the device's file system. All read and write operations are run directly against the SQLite disk file.
The SQLite native libraries are built into Android and iOS by default; however, the engine only supports a C/C++ API. This scenario isn't ideal for .NET developers, who want some way for SQLite and .NET to interact.
### What is SQLite-net?
There are several C# wrappers around the native SQLite engine that .NET developers can use. Many .NET developers use a popular C# wrapper called *SQLite-net*.
SQLite-net is an object-relational mapper. It helps simplify the process of defining database schemas by letting you use the models that are defined in your projects to serve as the schema.
{% hint style="info" %}
In the image above, "your app" refers to the Wisej.NET Hybrid **Local** application.
{% endhint %}
As an example, consider the following class that models a `User`:
```csharp
class User
{
public int Id { get; set; }
public string Username { get; set; }
...
}
```
By using an object-relational mapper, you can take this initial `User` class and create a database table called `User` that has columns for the `Id` and `Username` fields in this class.
SQLite-net is shipped as a NuGet package. You must add the **sqlite-net-pcl** package to your apps to use it. Use the NuGet package manager in Visual Studio. Additionally, if you want to run an app on Android, you must also add the **SQLitePCLRaw\.provider.dynamic\_cdecl** package.
### How to connect to a SQLite database
You can establish a connection to a SQLite database from an app through a `SQLiteConnection` object. This class is defined in the `SQLite` namespace, together with the other types and methods SQLite provides. When you instantiate this object, you pass in the filename for the database file. The constructor will then either open the file if it exists or create it if it isn't present.
The following code shows an example:
```csharp
using SQLite;
...
string filename = ...
SQLiteConnection conn = new SQLiteConnection(filename);
```
Remember that `filename` should point to a location in the app sandbox.
{% hint style="info" %}
You can get a path to the device's app sandbox by using **Device.Info.FileSystem.AppDataDirectory;**
{% endhint %}
### How to create a table
Recall that SQLite-net is an object-relational mapper, which means you can build your database schema from C# classes. SQLite-net can build a database table from an ordinary C# class, but there are many attributes that you can add to a class to provide additional metadata. This metadata helps SQLite to enforce features such as uniqueness and apply constraints to your data.
The attributes available include:
* **`Table`**: Specify the name of the table if you want it to be something other than the class's name
* **`PrimaryKey`**: Specify that a column is the primary key
* **`AutoIncrement`**: Specify that a column should automatically increase in value when a new row is inserted
* **`Column`**: Specify the name of a column if you want it to be something other than the property name
* **`MaxLength`**: Specify the maximum number of characters that can be used in the column
* **`Unique`**: Specify that the value in the column must be unique from all other rows
The following code shows an updated version of the `User` class that applies these attributes:
```csharp
[Table("user")]
public class User
{
// PrimaryKey is typically numeric
[PrimaryKey, AutoIncrement, Column("_id")]
public int Id { get; set; }
[MaxLength(250), Unique]
public string Username { get; set; }
...
}
```
After you define your C# class, call the `CreateTable` generic method on the `SQLiteConnection` class to generate the table in the database. Specify the class as the type parameter. Here's an example:
```csharp
SQLiteConnection conn = new SQLiteConnection(filename);
conn.CreateTable();
```
If the table already exists in the database, the `CreateTable` method checks the schema to see if there are any changes. If there are, the operation attempts to update the database schema.
### How to do basic read and write operations
After you create a table, you can start interacting with it. To add a row, use the `Insert` method on the `SQLiteConnection` instance and provide an object of the appropriate type that holds the data to be inserted. The following code shows how to add a new row to the `User` table:
```csharp
public int AddNewUser(User user)
{
int result = conn.Insert(user);
return result;
}
```
The `Insert` method returns an `int`, which represents the number of rows inserted into the table. In this case, that number is one.
To retrieve rows from a table, use the `Table` method. This method returns a collection of objects (which might be empty):
```csharp
public List GetAllUsers()
{
List users = conn.Table().ToList();
return users;
}
```
The `Table` method returns a `TableQuery\` object. To get a `List`, use the `ToList` method as shown in the preceding example.
### Execute a SQLite query by using LINQ
The `Table` method retrieves all the rows from a table. On most occasions, you want to return only a subset of the rows that match a set of specified criteria. For these tasks, use LINQ with SQLite-net.
SQLite-net supports many common LINQ queries including:
* Where
* Take
* Skip
* OrderBy
* OrderByDescending
* ThenBy
* ElementAt
* First
* FirstOrDefault
* ThenByDescending
* Count
With these methods, you can use the extension method syntax or the LINQ C# syntax. For example, here's a snippet of code that enables you to retrieve the details of a specified user:
```csharp
public User GetByUsername(string username)
{
var user = from u in conn.Table()
where u.Username == username
select u;
return user.FirstOrDefault();
}
```
### Update and delete rows
You update a row using the `SQLiteConnection` object's `Update` method. You provide an object defining the row to be updated with its new values. The `Update` method modifies the row that has the same primary key value as the provided object. The value returned is the number of rows changed. If this value is zero, then no rows with a matching primary key were found, and nothing was updated. The next snippet shows this method in action:
```csharp
public int UpdateUser(User user)
{
int result = 0;
result = conn.Update(user);
return result;
}
```
Remove rows from a table with the `SQLiteConnection` object's `Delete` method. The simplest form of this method takes the primary key of the item to be deleted as the parameter, as shown in the following example. This form of the `Delete` method is generic, and it requires a type parameter. The value returned is the number of rows removed from the table:
```csharp
public int DeleteUser(int userID)
{
int result = 0;
result = conn.Delete(userID);
return result;
}
```
{% embed url="" %}
Source Material
{% endembed %}
---
# Agent Instructions
This documentation is published with GitBook. GitBook is the documentation platform designed so that both humans and AI agents can read, navigate, and reason over technical content effectively. Learn more at gitbook.com.
## Querying This Documentation
If you need additional information that is not directly available in this page, you can query the documentation dynamically by asking a question.
Perform an HTTP GET request on the current page URL with the `ask` query parameter, and the optional `goal` query parameter:
```
GET https://docs.wisej.com/hybrid/storage/store-data-locally-with-sqlite.md?ask=&goal=
```
`ask` is the immediate question: it should be specific, self-contained, and written in natural language.
`goal` is optional and describes the broader end goal you are ultimately trying to accomplish on behalf of the user. GitBook uses it to tailor the answer towards what is most useful for that goal.
The response will contain a direct answer to the question and relevant excerpts and sources from the documentation.
Use this mechanism when the answer is not explicitly present in the current page, you need clarification or additional context, or you want to retrieve related documentation sections.